Index
從異世界歸來的第七天 - Kubernetes 三兄弟 - 實戰做一個 Service (二)
概述
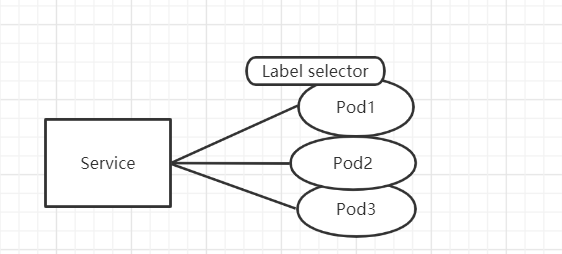
還記得上一篇文章我們使用 port-forward 實現將本地的接口轉發到 Kubernetes 中指定的 Pod 操作嗎?而 Service 元件就是 Kubernetes 特地為了用來定義『一群 Pod 要如何被連線及存取』 的元件,此舉不只將暴露端口的任務解耦抽象出來,更利用 Labels 和 Seletor 來識別需要套用該設定這些屬於非永久資源的 Pod,如此一來,當 Pod 被動態的創建或銷毀時,相較於直接使用 port-forward 的 Pod 將會失去他的暴露端口,而新創建出來的 Pod 會因為具有原來的 Labels 而繼續套用我們先前暴露端口的相關設定。
使用 Service 實現 LoadBalance
就讓我們來由把昨天 foo 再新增一個夥伴 bar ,並且使用 Service 來實作看看如何管理這兩個 Pod 吧:
// pod.yaml

apiVersion: v1
kind: Pod
metadata:
  name: foo
  labels:
    app: foo
    type: demo
spec:
  containers:
    - name: foo
      image: mikehsu0618/foo
      ports:
        - containerPort: 8080
---
apiVersion: v1
kind: Pod
metadata:
  name: bar
  labels:
    app: bar
    type: demo
spec:
  containers:
    - name: bar
      image: mikehsu0618/bar
      ports:
        - containerPort: 8080
撰寫 Service 設定 :
// service.yaml
apiVersion: v1
kind: Service
metadata:
  name: my-service
spec:
  selector:
    type: demo
  type: LoadBalancer
  ports:
    - protocol: TCP
      port: 8000
      targetPort: 8080
      nodePort: 30390
apiVersion: Service 使用的Kubernetes APIv1版本metadata.name: 該 Service 的名稱。spec.type: 可以指定 Service 的型別,可以是NodePort或是LoadBalancerspec.ports.port: 可以指定,創建的 Service 的 Cluster IP,是哪個 port number 去對應到targetPort。spec.ports.nodePort: 可以指定Node物件是哪一個 port number,去對應到targetPort,若是在 Service 的設定檔中沒有指定的話,Kubernetes 會隨機幫我們選一個 port number。spec.ports.targetPort: targetPort 是我們指定的 Pod 的 port number,由於我們會在Pod中運行一個port number 8080 的 container (foo & bar),所以我們指定k8s02-service的特定port number 都可以導到該 container。spec.ports.protocol: 目前 Service 支援TCP、SCTP與UDP三種 protocol,預設為TCP。spec.selector: selector 則會幫我們過濾,在範例中,我們創建的 Service 會將特定的 port number 收到的流量導向Lable 為 type=demo的 Pods。
運行 Service, Pod 設定檔
運行一下設定檔:
kubectl apply -f pod.yaml,service.yaml
查看服務狀態:
kubectl get services  // 查看服務
or
kubectl get all       // 查看全部元件狀態
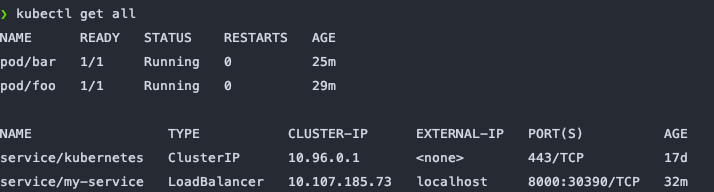
由上圖可以看出我們順利的 run 起一個 LoadBalancer ,如果我們的Kubernetes Cluster是架在第三方雲端服務(cloud provider),例如 Amazon 或 Google Cloud Platform,我們可以透過這些 cloud provider 提供的 LoadBalancer ,幫我們分配流量到每個 Node ,而我們使用 docker-desktop 直接會預設幫我們把 External IP 指向到我們的 [localhost](http://localhost) 。
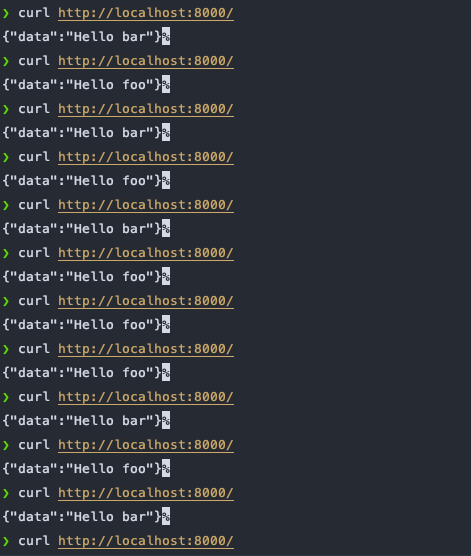
由此一來,當我們使用 curl 去 call 我的設定好的 8000端口 ,Kubernetes Service 就會將我們的流量隨機分配到 foo bar 這兩個 container 中。
curl localhost:8080
結論
Kubernetes的Service 讓我們非常簡單的實現管理 Pod 流量以及 LoadBalance 的功能,在以前可是需要到雲端平台一個一個設定才可以辦到,Kubernetes 幫我們省下許多細節使我們可以專注在實現維運部署的邏輯上面,但背後的觀念非常值得我們回來細細咀嚼,在這裡只是先做一個簡單的小 demo,日後將會對 Service 的運作機制做更深入的了解。
Reference